
A car jump starter is a portable device designed to jump-start a vehicle with a dead battery․ It’s an essential tool for emergencies, offering convenience, safety, and reliability․

1․1 What Is a Car Jump Starter?
A car jump starter is a portable electronic device designed to jump-start a vehicle with a dead or weak battery․ Unlike traditional jumper cables, which require another vehicle, a portable jump starter operates independently, making it a convenient solution for emergencies․ These devices store electrical energy and provide the necessary power to start a car engine․ They are equipped with cables and clamps that connect directly to the battery terminals․ Modern jump starters often include additional features such as USB ports for charging smartphones or other devices, LED lights for illumination, and safety protections like overcharge prevention․ They are compact, easy to use, and eliminate the need for another vehicle, making them a must-have tool for drivers seeking reliability and safety․ Their portability and versatility have made them a popular choice for roadside emergencies․
1․2 Types of Car Jump Starters
Car jump starters come in various types, catering to different needs and preferences․ The most common are portable jump starters, which are compact, lightweight, and easy to carry․ These are ideal for personal use, offering a balance of power and portability․ Heavy-duty jump starters are designed for larger vehicles like trucks and SUVs, providing higher power output for robust engines․ Some models combine jump-starting with other functions, such as solar-powered jump starters, which are eco-friendly and suitable for outdoor enthusiasts․ Additionally, there are jump starters with built-in compressors, enabling users to inflate tires while on the go․ Each type varies in features, capacity, and price, ensuring drivers can choose the best option for their specific requirements and vehicle types․ This variety makes jump starters versatile tools for various automotive needs․
1․3 Advantages of Using a Portable Jump Starter
Using a portable jump starter offers numerous advantages, making it an indispensable tool for car owners․ Its compact design allows for easy storage in a vehicle, ensuring it’s always available during emergencies․ Unlike traditional jumper cables, portable jump starters eliminate the need for another vehicle, providing a self-sufficient solution․ They are also safer, as they often include built-in protections against overcharging, short circuits, and voltage spikes․ Many models come with additional features like USB ports for charging devices, LED lights for illumination, and air compressors for inflating tires․ This versatility makes them a multi-functional accessory for drivers․ Furthermore, portable jump starters are user-friendly, with clear instructions and simple connections, reducing the risk of errors․ Their reliability and convenience make them a must-have for any driver seeking peace of mind on the road․ This ensures a quick and efficient solution to a dead battery without needing external assistance․

Safety Precautions and Essential Checks
Safety precautions are crucial when using a car jump starter․ Always ensure the vehicle is turned off, avoid electrical components, and prevent metal contact․ Check terminals for corrosion and ensure proper voltage compatibility․ Essential for a safe jump-start process․
2․1 Pre-Jump Safety Measures
Before attempting to jump-start a car, ensure both vehicles are turned off and in neutral or park gear․ Engage the parking brake for safety․ Locate a well-ventilated area away from open flames or sparks․ Turn off all electrical components, including lights, radios, and wipers, to prevent electrical surges․ Avoid touching metal parts to prevent shocks․ Check the dead battery for damage or leaks, and ensure terminals are clean and free of corrosion․ Verify the voltage compatibility between the dead battery and the donor vehicle․ Always refer to the vehicle’s manual for specific instructions․ Ensure the vehicles are not touching each other to prevent short circuits․ Properly secure the vehicles to avoid movement during the process․ These precautions help prevent accidents and ensure a safe jump-starting experience․
2․2 Checking the Car Battery and Terminals
Inspect the car battery and terminals before jump-starting․ Look for signs of damage, leaks, or corrosion․ Clean terminals using a wire brush to ensure good connectivity․ Check the battery voltage with a multimeter․ Ensure the terminals are tightly secured․ Verify the battery’s water level if applicable․ Inspect cables for frays or breaks․ Avoid jump-starting a cracked or leaking battery․ If corrosion is present, clean it with a mixture of baking soda and water․ Properly secure the battery to prevent movement․ Ensure all connections are snug and not loose․ Check for any blockages in the terminals․ If the battery is old or weak, it may require replacement․ Always wear protective gloves and eyewear when handling batteries․ A thorough inspection ensures a safe and effective jump-start process․ Regular maintenance can prevent future issues with the battery and electrical system․
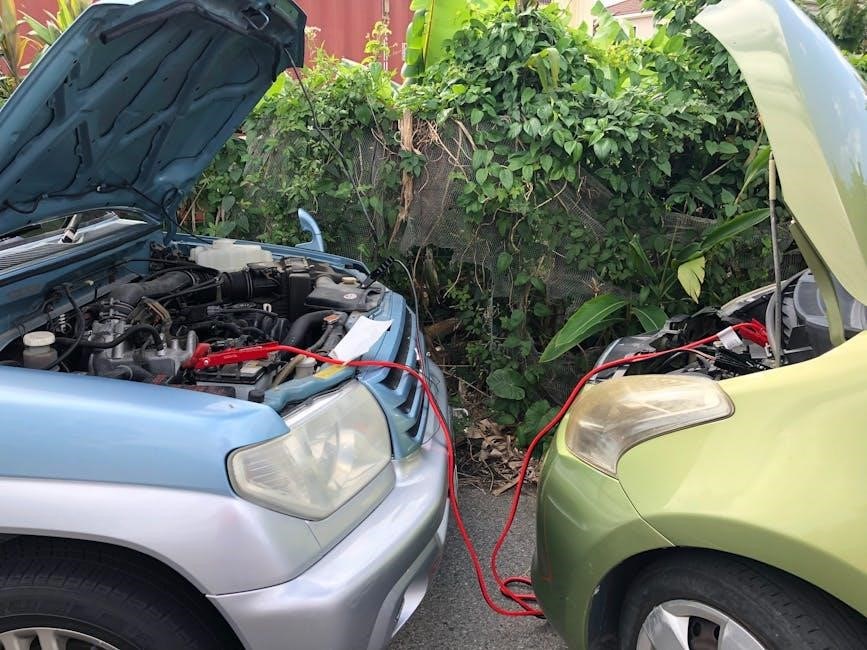
2․3 Ensuring Proper Vehicle Placement
Proper vehicle placement is critical for a safe and successful jump start․ Park the vehicles on a flat, stable surface, ensuring they do not touch each other․ Turn off the engines, lights, and all electrical accessories in both cars․ Engage the parking brake on both vehicles to prevent movement․ Position the vehicles so the hoods are facing each other, allowing easy access to both batteries․ Avoid placing the vehicles in a confined or poorly ventilated space․ Ensure the area is clear of flammable materials․ If the dead car’s battery is located in a compartment other than the engine bay, refer to the owner’s manual for designated jump-start terminals․ Always maintain a safe distance between the vehicles to prevent any accidental contact․ Proper placement minimizes risks and ensures a secure connection for the jump-start process․
Step-by-Step Guide to Using a Portable Jump Starter
Locate the car battery, connect the jump starter clamps to the terminals, start the engine, and disconnect the device safely after the car is running smoothly․
3․1 Locating the Car Battery and Terminals

Start by opening the car hood and locating the battery, typically found in the engine compartment․ The battery is a small, rectangular box with two metal terminals on top․ These terminals are marked with a positive (+) and negative (-) sign․ The positive terminal is usually connected to a red cable, while the negative terminal is connected to a black cable․ In some vehicles, the battery may be located elsewhere, such as in the trunk or under the floor․ Always refer to the car’s owner’s manual for specific guidance․ Before connecting the jump starter, ensure the terminals are clean and free of corrosion․ If corroded, use a wire brush to clean them for better connectivity․ Properly identifying and accessing the terminals is essential for a safe and effective jump-starting process․
3․2 Connecting the Jump Starter to the Battery
Attach the red (positive) clamp of the jump starter to the positive terminal on the car battery․ Ensure it’s securely connected to the terminal․ Next, connect the other end of the red clamp to the designated positive terminal on the jump starter․ Now, take the black (negative) clamp and connect it to the negative terminal on the car battery or a solid metal ground, such as a bolt on the engine block․ Avoid touching any moving parts or electrical components․ Once all connections are secure, turn on the jump starter․ Start the car’s engine and let it run for a few minutes to allow the battery to charge․ Monitor the connections to ensure they remain stable and avoid any sparks or short circuits during the process․
3․3 Starting the Car and Disconnecting the Jump Starter
Once the jump starter is connected, start the car’s engine․ Allow it to run for a few minutes to charge the battery․ Ensure the jump starter’s indicator lights confirm a successful connection․ After the car starts, turn off the jump starter․ Disconnect the black (negative) clamp first from the ground or battery terminal, then remove the red (positive) clamp from the car battery․ Avoid letting the clamps touch each other or metal surfaces during disconnection to prevent sparks․ Finally, remove the remaining clamps from the jump starter․ Properly store the jump starter and let the car run for at least 15 minutes to recharge the battery fully․ If the car doesn’t start, check the connections and try again․ Always follow the manufacturer’s instructions for specific models․

Common Mistakes to Avoid
Avoid incorrect cable connections, ignoring safety guidelines, and failing to recharge the battery after a jump start․ These mistakes can lead to damage, safety risks, or repeated issues․
4․1 Incorrect Cable Connections
Incorrectly connecting jumper cables is a common mistake that can lead to safety hazards, electrical damage, or even explosions․ Always ensure the cables are attached in the correct order: red to the positive terminal of the dead battery, red to the positive terminal of the good battery, black to the negative terminal of the good battery, and black to an unpainted metal surface on the dead car․ Never connect the black cable to the negative terminal of the dead battery, as this can cause a short circuit․ Mixing up the cables or touching metal parts can spark, risking serious injury or damage․ Always double-check connections before starting the process․ If unsure, consult the device’s manual or seek assistance․ Proper connections are crucial for a safe and successful jump start․
4․2 Ignoring Safety Guidelines
Ignoring safety guidelines when using a car jump starter can lead to dangerous situations, including electrical shocks, explosions, or damage to your vehicle․ Always ensure both vehicles are turned off and in neutral or park gear to prevent any unintended movement․ Disconnect electrical components like lights, radios, and wipers to avoid power surges․ Never touch metal parts of the cables to prevent sparks, as this could ignite hydrogen gas near the battery․ Ensure vehicles are not touching each other, as this can create a short circuit․ Properly follow the connection order: red to dead battery’s positive terminal, red to good battery’s positive terminal, black to good battery’s negative terminal, and black to an unpainted metal surface on the dead car․ Ignoring these steps can result in serious injury or damage․ Always prioritize safety and consult the manual if unsure․
4․3 Failing to Charge the Battery After a Jump Start
Failing to charge the battery after a jump start can lead to repeated breakdowns and potential damage to your car’s electrical system․ After a successful jump start, it’s crucial to allow the alternator to recharge the battery by driving the car for at least 15–20 minutes․ If you don’t, the battery may lose its charge again, leaving you stranded․ Ignoring this step can result in a dead battery, requiring another jump start or even professional assistance․ Over time, this can shorten the battery’s lifespan and strain the alternator․ Always ensure the battery is fully charged after a jump start to prevent further issues and maintain your car’s performance․
Troubleshooting Tips
Troubleshooting your car jump starter is essential for resolving issues quickly and safely․ Common problems include dead batteries, faulty connections, or malfunctioning components․ Always refer to your device’s manual for guidance․
5․1 Diagnosing Why the Car Won’t Start After a Jump
If your car doesn’t start after a jump, check the connections and ensure the jump starter is fully charged․ A weak or old battery may require longer charging․ Also, inspect the alternator, as it may not be recharging the battery properly․ Faulty components like the starter motor or ignition switch could also prevent the car from starting․ Additionally, check for issues like a bad fuel pump or empty fuel tank․ If the problem persists, consult a professional mechanic to diagnose and resolve the issue effectively․
5․2 Understanding Jump Starter Indicator Lights
Indicator lights on a jump starter provide crucial information about its status and operation․ A green light typically indicates the device is fully charged and ready to use, while a red light signals a low battery or potential issue․ Flashing lights may indicate improper connections or errors during the jump-start process․ Refer to the device’s manual to interpret specific light patterns, as they vary by model․ If the lights illuminate incorrectly, ensure the clamps are connected properly and the battery terminals are clean․ Some advanced models may display error codes, which can help diagnose problems like short circuits or overheating․ Always check the lights before and after use to ensure the jump starter is functioning correctly and safely․ This feature enhances user experience and helps troubleshoot common issues efficiently․
5․3 Dealing with a Dead Jump Starter Battery
If your jump starter battery is dead, it won’t function properly․ First, charge it using the provided wall adapter or car charger․ Ensure the charging port is clean and free from debris․ If the battery still doesn’t charge, check the power source and cable connections․ A dead battery may result from prolonged disuse or incorrect storage․ If charging doesn’t resolve the issue, inspect the device for damage or corrosion․ Clean the terminals with a soft cloth and try again․ If the problem persists, the battery may need replacement․ Always refer to the manufacturer’s guide for specific instructions․ Regular maintenance, such as periodic charging, can prevent a dead battery․ If the jump starter is outdated or damaged beyond repair, consider replacing it with a new model․ Proper care ensures your jump starter remains reliable for emergencies․
Maintenance and Storage of Your Jump Starter
Regularly clean the terminals, store in a cool, dry place, and keep the battery charged to maintain your jump starter’s performance and longevity for emergency use․
6․1 Cleaning the Battery Terminals
Cleaning your jump starter’s battery terminals is crucial for maintaining proper conductivity and ensuring reliable performance․ Start by disconnecting the negative terminal to prevent electrical shocks․ Use a wire brush to gently scrub away any corrosion or buildup on both the positive and negative terminals․ For tougher corrosion, mix baking soda and water to create a paste, and apply it to the terminals․ Let it sit for a few minutes before scrubbing․ Rinse with clean water and dry thoroughly with a clean towel․ Regular cleaning prevents corrosion and ensures your jump starter functions effectively․ Additionally, applying a layer of petroleum jelly or silicone spray can help protect the terminals from future corrosion․ Always follow safety guidelines to avoid accidents during the cleaning process․
6․2 Proper Storage Conditions
Storing your portable jump starter correctly ensures its longevity and performance․ Keep it in a cool, dry place, away from direct sunlight and moisture․ Avoid extreme temperatures, as they can drain the battery or cause damage․ Store the device in a protective case or bag to prevent physical damage and dust accumulation․ If you won’t be using it for an extended period, charge it to about 50% capacity and check it every few months to maintain the battery’s health․ Do not store it in a vehicle or areas prone to humidity․ Proper storage conditions help preserve the jump starter’s power and ensure it’s ready for emergencies․ Always refer to the manufacturer’s guidelines for specific storage recommendations․
6․3 Charging and Maintaining the Jump Starter
Regular charging and maintenance are crucial to ensure your portable jump starter remains reliable․ Always follow the manufacturer’s charging instructions to avoid overcharging, which can harm the battery․ Check the battery level using the built-in indicator or by plugging it into a power source․ If the voltage is low or the indicator lights dim, it’s time to charge․ Use the provided charger or a compatible alternative to prevent damage․ Overcharging can reduce the battery’s lifespan, so unplug it once fully charged․ For long-term maintenance, inspect the device every 3-6 months for signs of wear or damage․ Clean the terminals with a soft cloth to ensure proper connections․ If storing for extended periods, charge it every 6 months to maintain battery health․ Proper care ensures your jump starter is always ready for emergencies․